

This integration is in beta. Contact your PolyAI account manager to check availability for your org.
Prerequisites
- Admin access to the Zoom App Marketplace
- Admin access to Zoom Phone System Management or Zoom Contact Center Management, depending on which product you’re connecting
- Confirmation from your PolyAI account manager that the integration is enabled for your org
Set up Zoom
In Agent Studio, go to Integrations, open the Telephony tab and click Add number. In the Add a number panel, under Integrate with your contact center platform, select Zoom. If the option shows Coming soon, contact your PolyAI account manager. The Zoom setup has three steps: Product, Install and Number.1
Choose your Zoom product
On the Product step, answer Which Zoom product are you connecting?
- Zoom Contact Center: you route calls through Contact Center flows. You add a Bot widget to a flow.
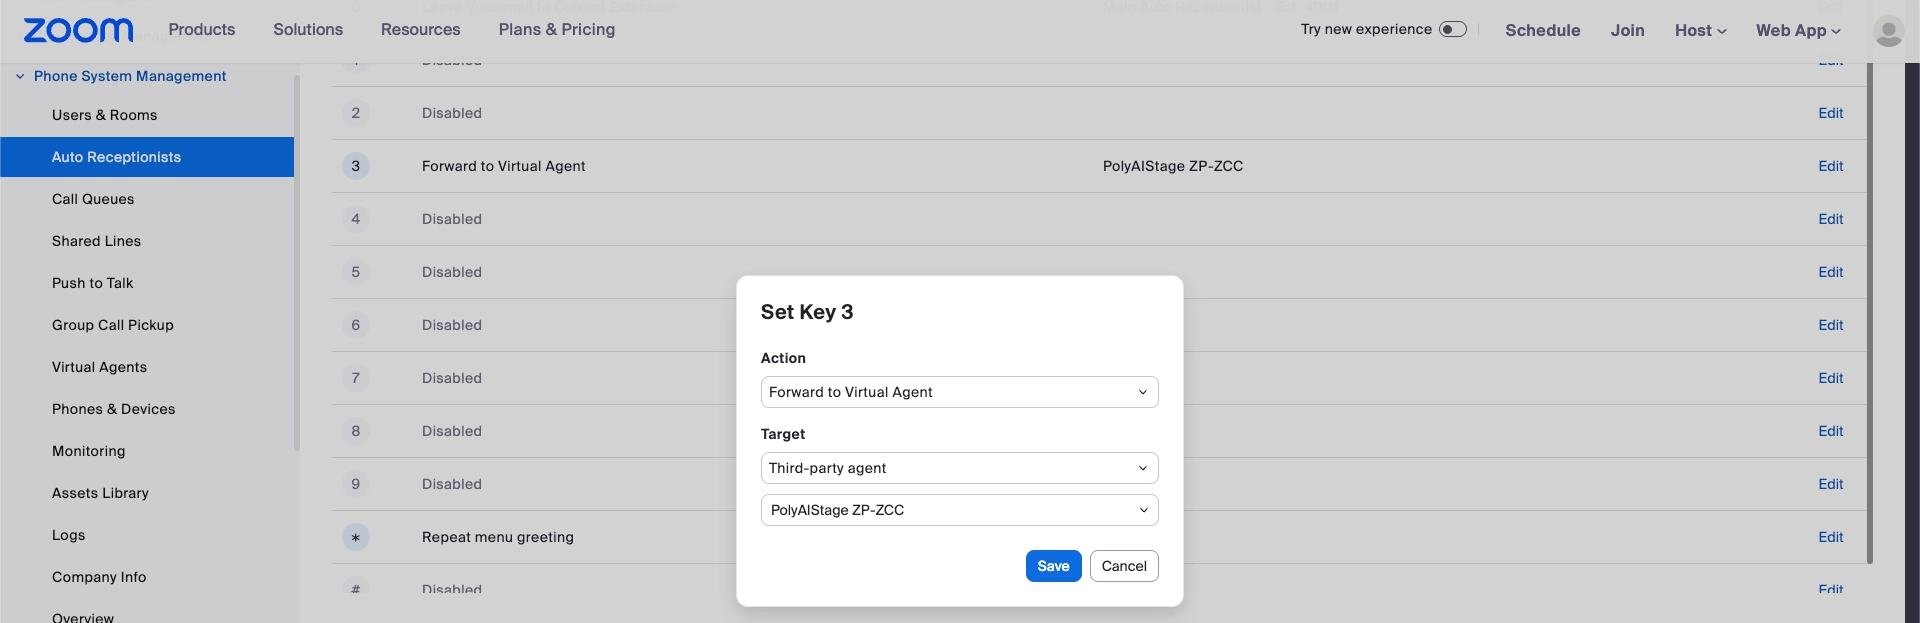
- Zoom Phone: you route calls through an Auto Receptionist. You add a third-party Virtual Agent under a key press.
2
Install the PolyAI app in Zoom
The Install step lists what to do in the Zoom admin console. Follow the tab for the product you chose. The first three steps are the same for both.
3
Add the number Zoom gave you
On the Number step, enter:
Where to find the number:
- Zoom Contact Center: it’s the Phone Number shown on the Bot widget, under the bot you selected. It’s usually 15 digits.
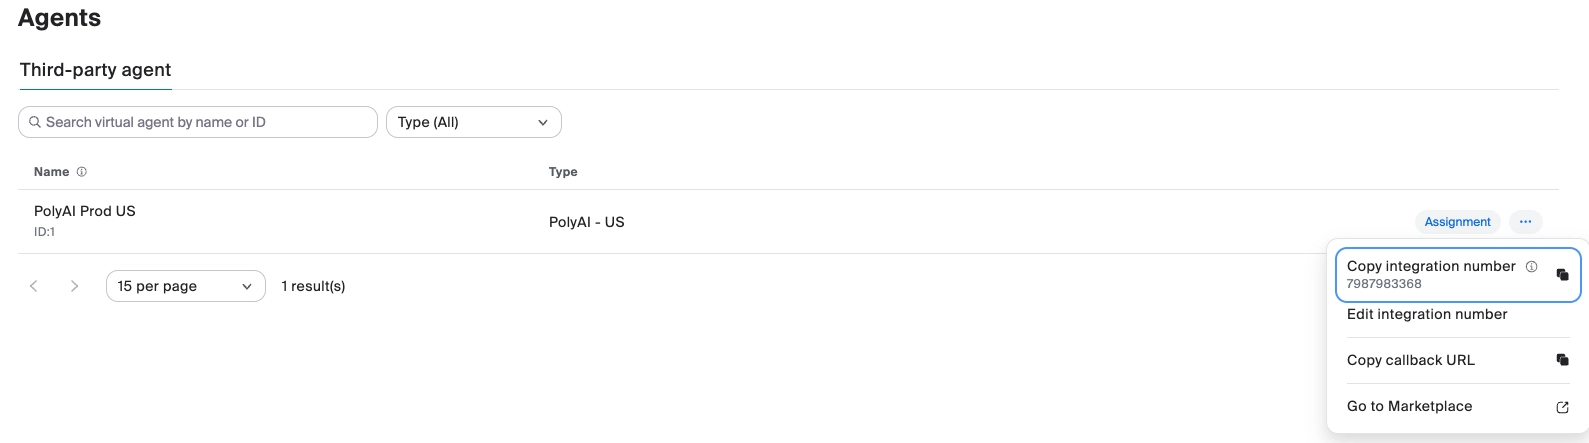
- Zoom Phone: on the Phone System Management > Agents screen, open the agent’s row menu and choose Copy integration number. It’s usually 10 digits.
Install the PolyAI app
These steps are the same for Zoom Phone and Zoom Contact Center. Open the Zoom App Marketplace to start.-
In Zoom, go to Advanced > App Marketplace and install the PolyAI App for your org.
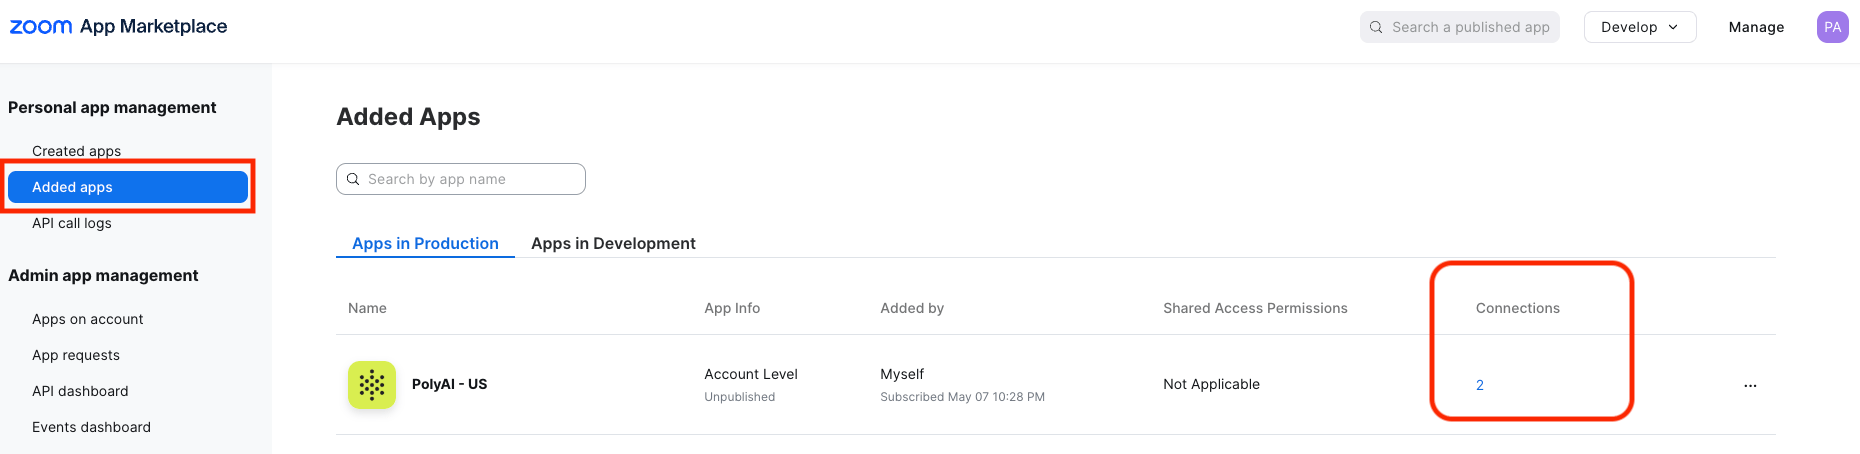
- Under the installed app, click the number shown under Connections. It defaults to 1.
- Create a connection for each environment you’ll route to, and name each one after its environment: sandbox, pre-release or live.
Route calls to PolyAI
- Zoom Contact Center
- Zoom Phone
Add the Bot widget to a flow
- In Contact Center Management, go to Flows and open the flow that answers your number.
-
From the Widgets menu, open Advanced and drag a Bot widget onto the canvas.
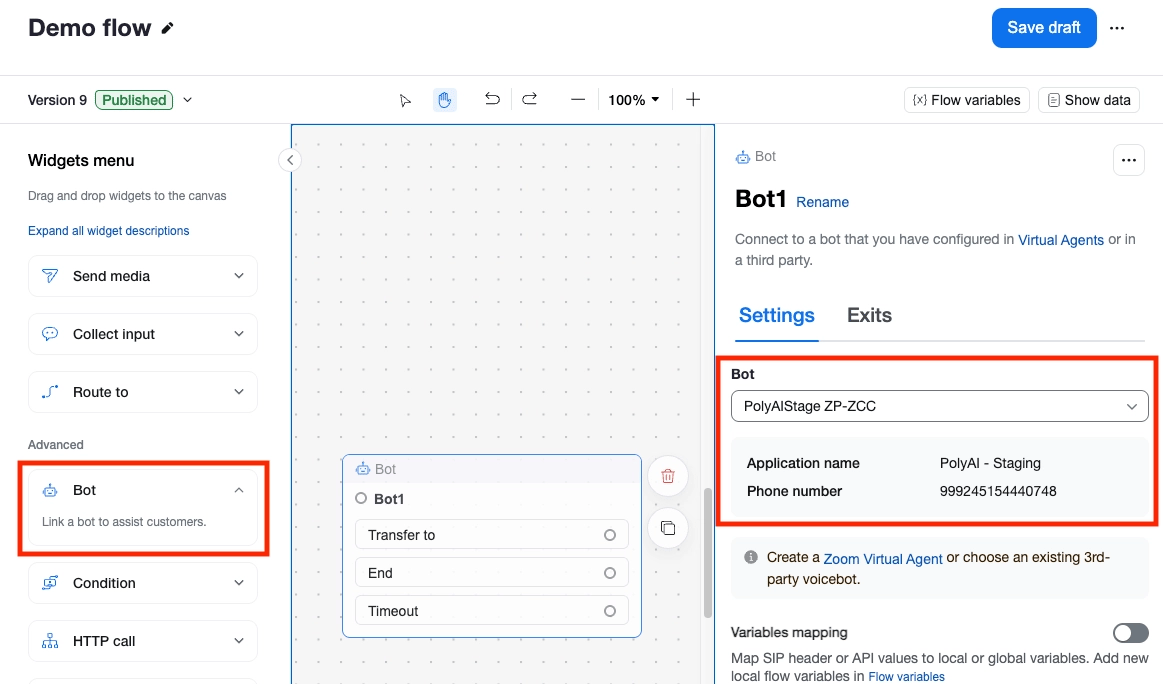
- On the widget, pick the connection for this environment and note the Phone Number shown under it. You enter it on the Number step in Agent Studio.
- Point the Timeout branch at a fallback destination in case the call can’t reach PolyAI.
- Save and publish the flow.
Connectors
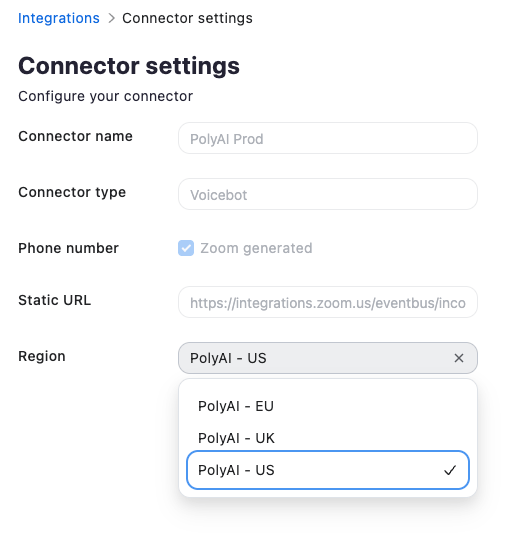
To let PolyAI pass a rich data payload back to ZCC:- Go to Contact Center Management > Integrations > Connectors.
- Click (…) next to the connector and select View connector settings.
- Select the correct region for your connector.
- Copy the Static URL and share it with PolyAI.
Passing data to and from PolyAI
Within the Bot configuration, data can be passed via SIP header mapping and/or the bot’s Outbound to Bot / Inbound from Bot options.Outbound to Bot (Zoom → PolyAI)- ZCC already passes
X-ZOOM-Call-SidandFromby default. - Use SIP header mapping to pass through anything else you need, such as the originally dialed number.
- Recommended: use the provided Webhook to pass data via API. Passing values back via SIP header mapping is also possible.
Handoff from PolyAI to ZCC
Pass metadata back via custom SIP headers or the Webhook (recommended, paired with Inbound from Bot above).The ZCC refer target format is alwaysHumanAgent@<SBC IP>:5061.When the call lands with the receiving agent, the handoff data passed via the Webhook appears as a screen pop in the ZCC agent console: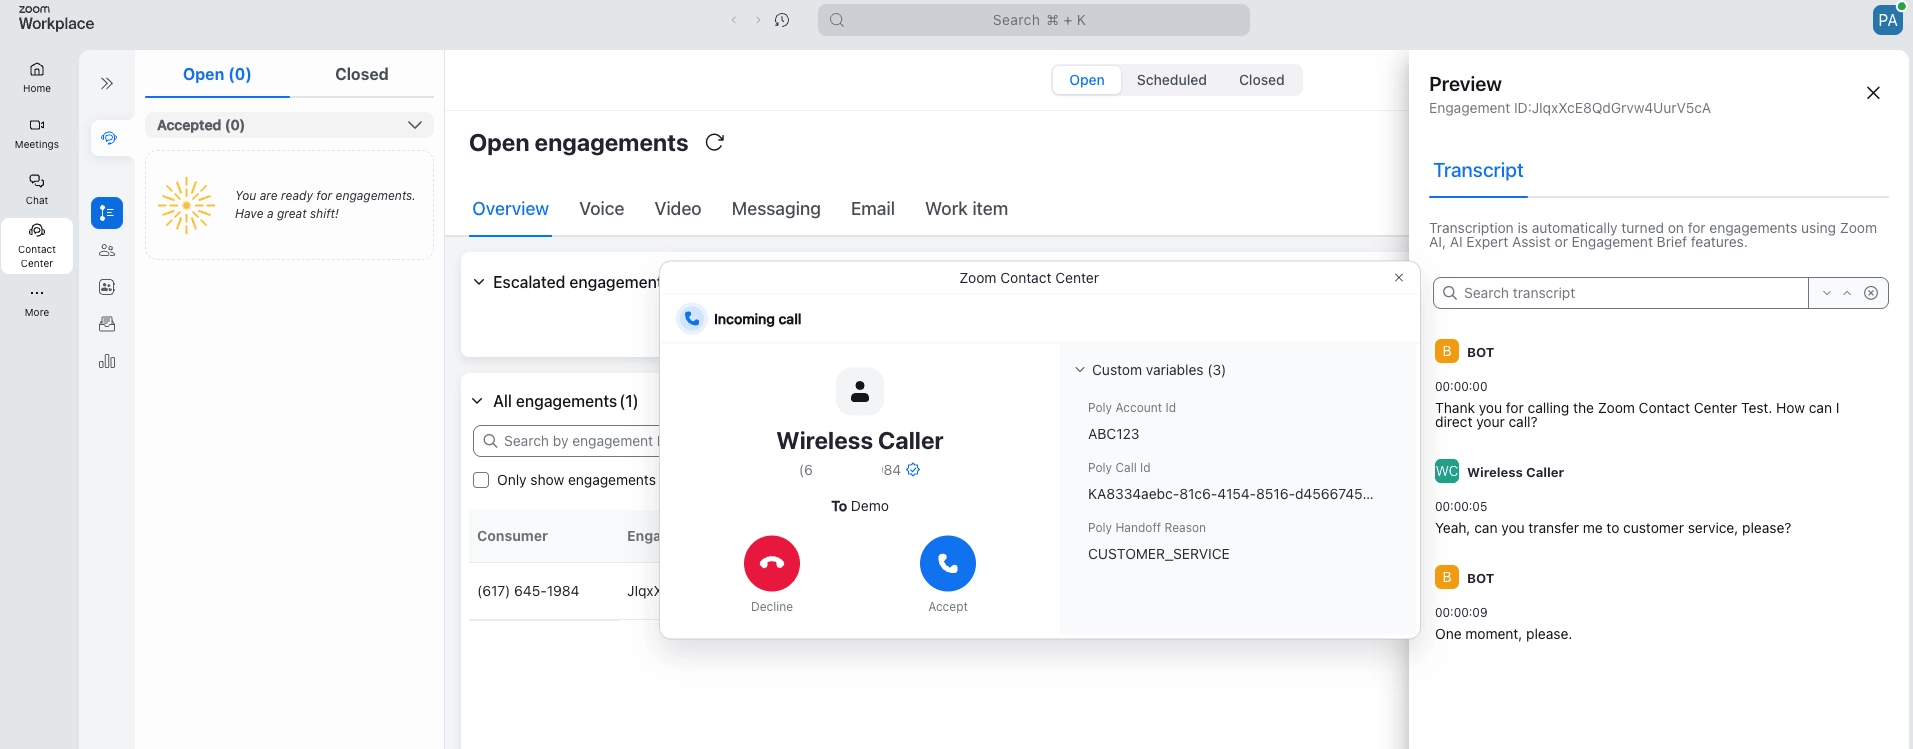
Testing the integration
- Make a test call to your Zoom Phone or Zoom Contact Center number.
- Verify the call routes to your PolyAI agent.
- Test a handoff scenario to confirm transfers back to a human agent work.
- Review the call in Conversations, filtered to Voice.
Troubleshooting
Related pages
Custom SIP
General SIP trunk integration reference.
Call handoffs
Configure call transfers back to a human agent.
Voice integrations
Other voice platform integrations.